Day2
I always thought it would be fun to have a Temperature Sensing Light Up Scarf that tells you the temperature by the color it is displaying. I love winter activities. It is wonderful to cozy up on the couch with a good book and a hot drink. Fun to bundle up and go outside for sledding or other snow related activities. Today we are going to create a Temperature Sensing Light Up Scarf that can sense the temperature and display different colors for temperatures. Lets get started
Gather you supplies
- Polar fleece or old scarf
- Lace Decoration / Appliques
- LED’s Sewable
- Temperature Sensor Sewable
- NeoPixels Sewable
- Arduino USB LilyPad Board
- Alligator clips
- Conductive Thread
- Needle
- Thread
- Sewing Machine
- Iron
- Chalk
Layout your Design
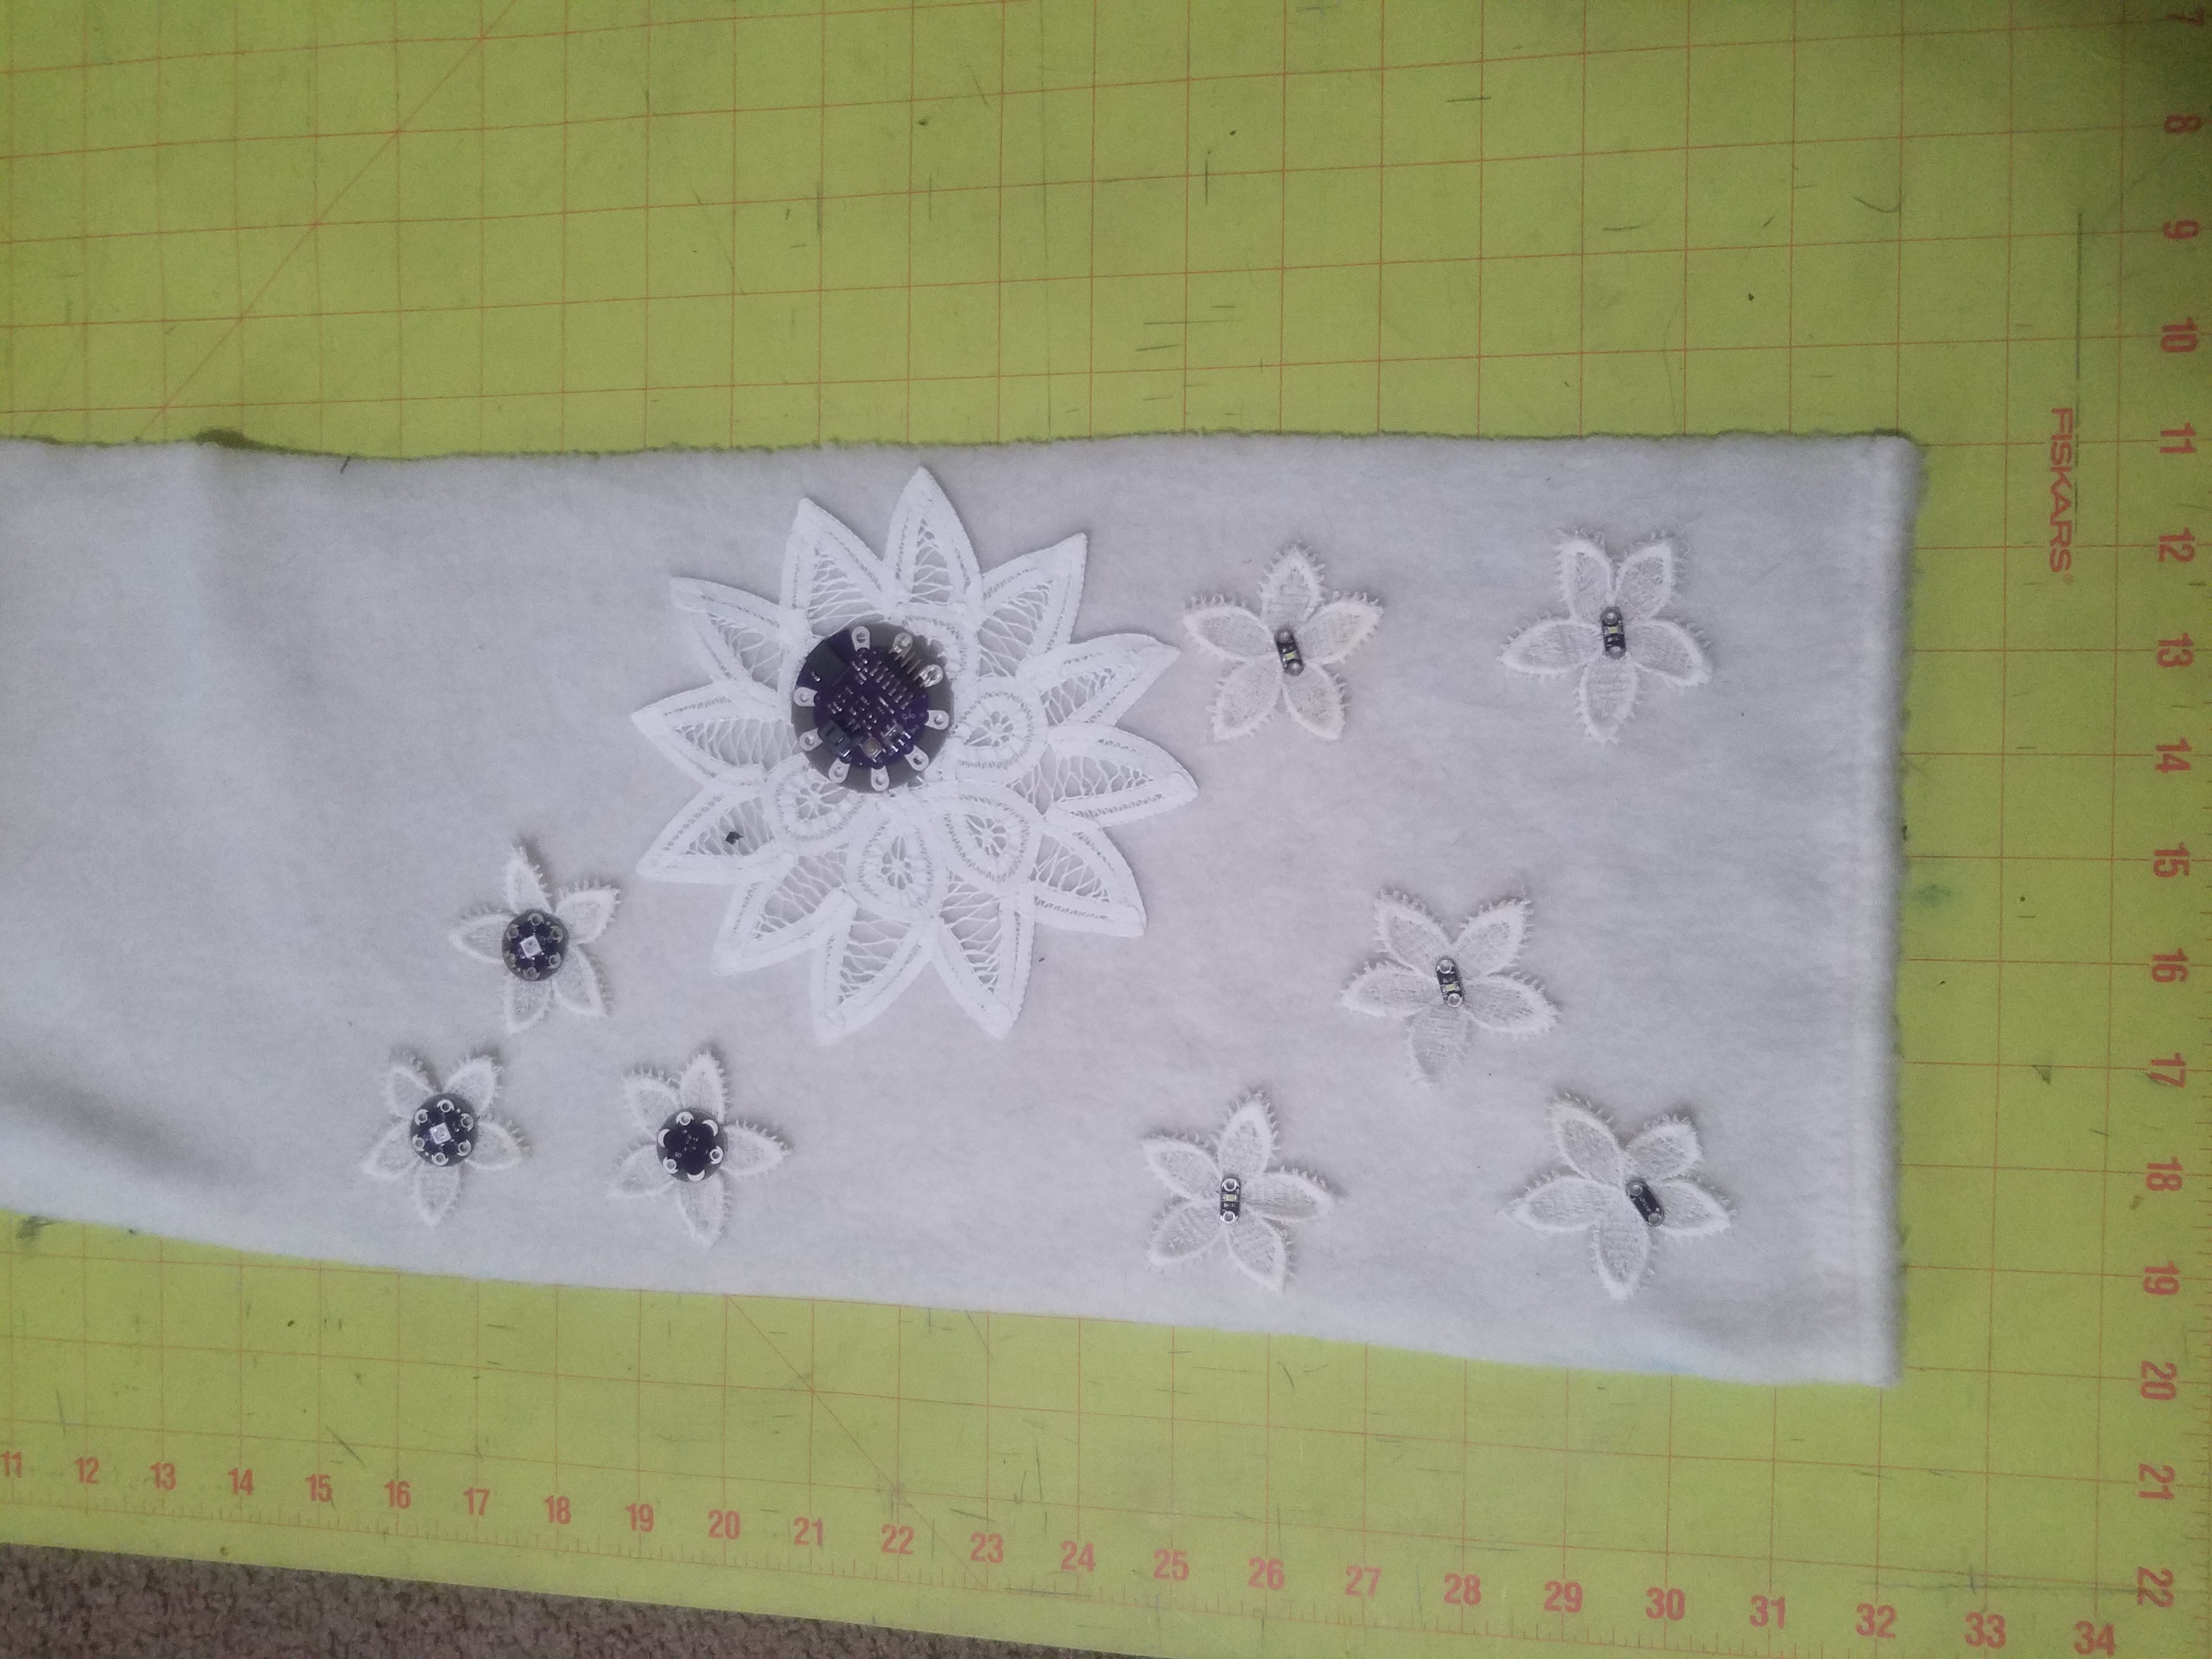
Now that you have everything we need to start by laying out our design. It is fun to try out a few different layouts to see which one you like the best. Make sure to take pictures of each layout so you can compare and recreate it later.

Once you have the final layout designed for your Temperature Sensing Light Up Scarf it is time to sew down your lace details or appliques. I choose to machine sew my appliques down
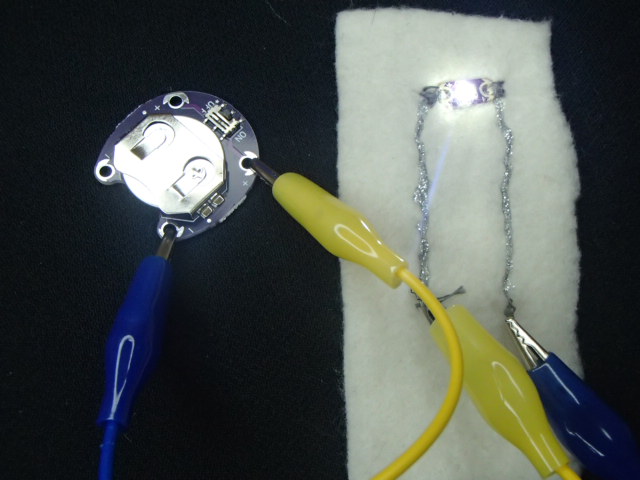
Testing the Circuit
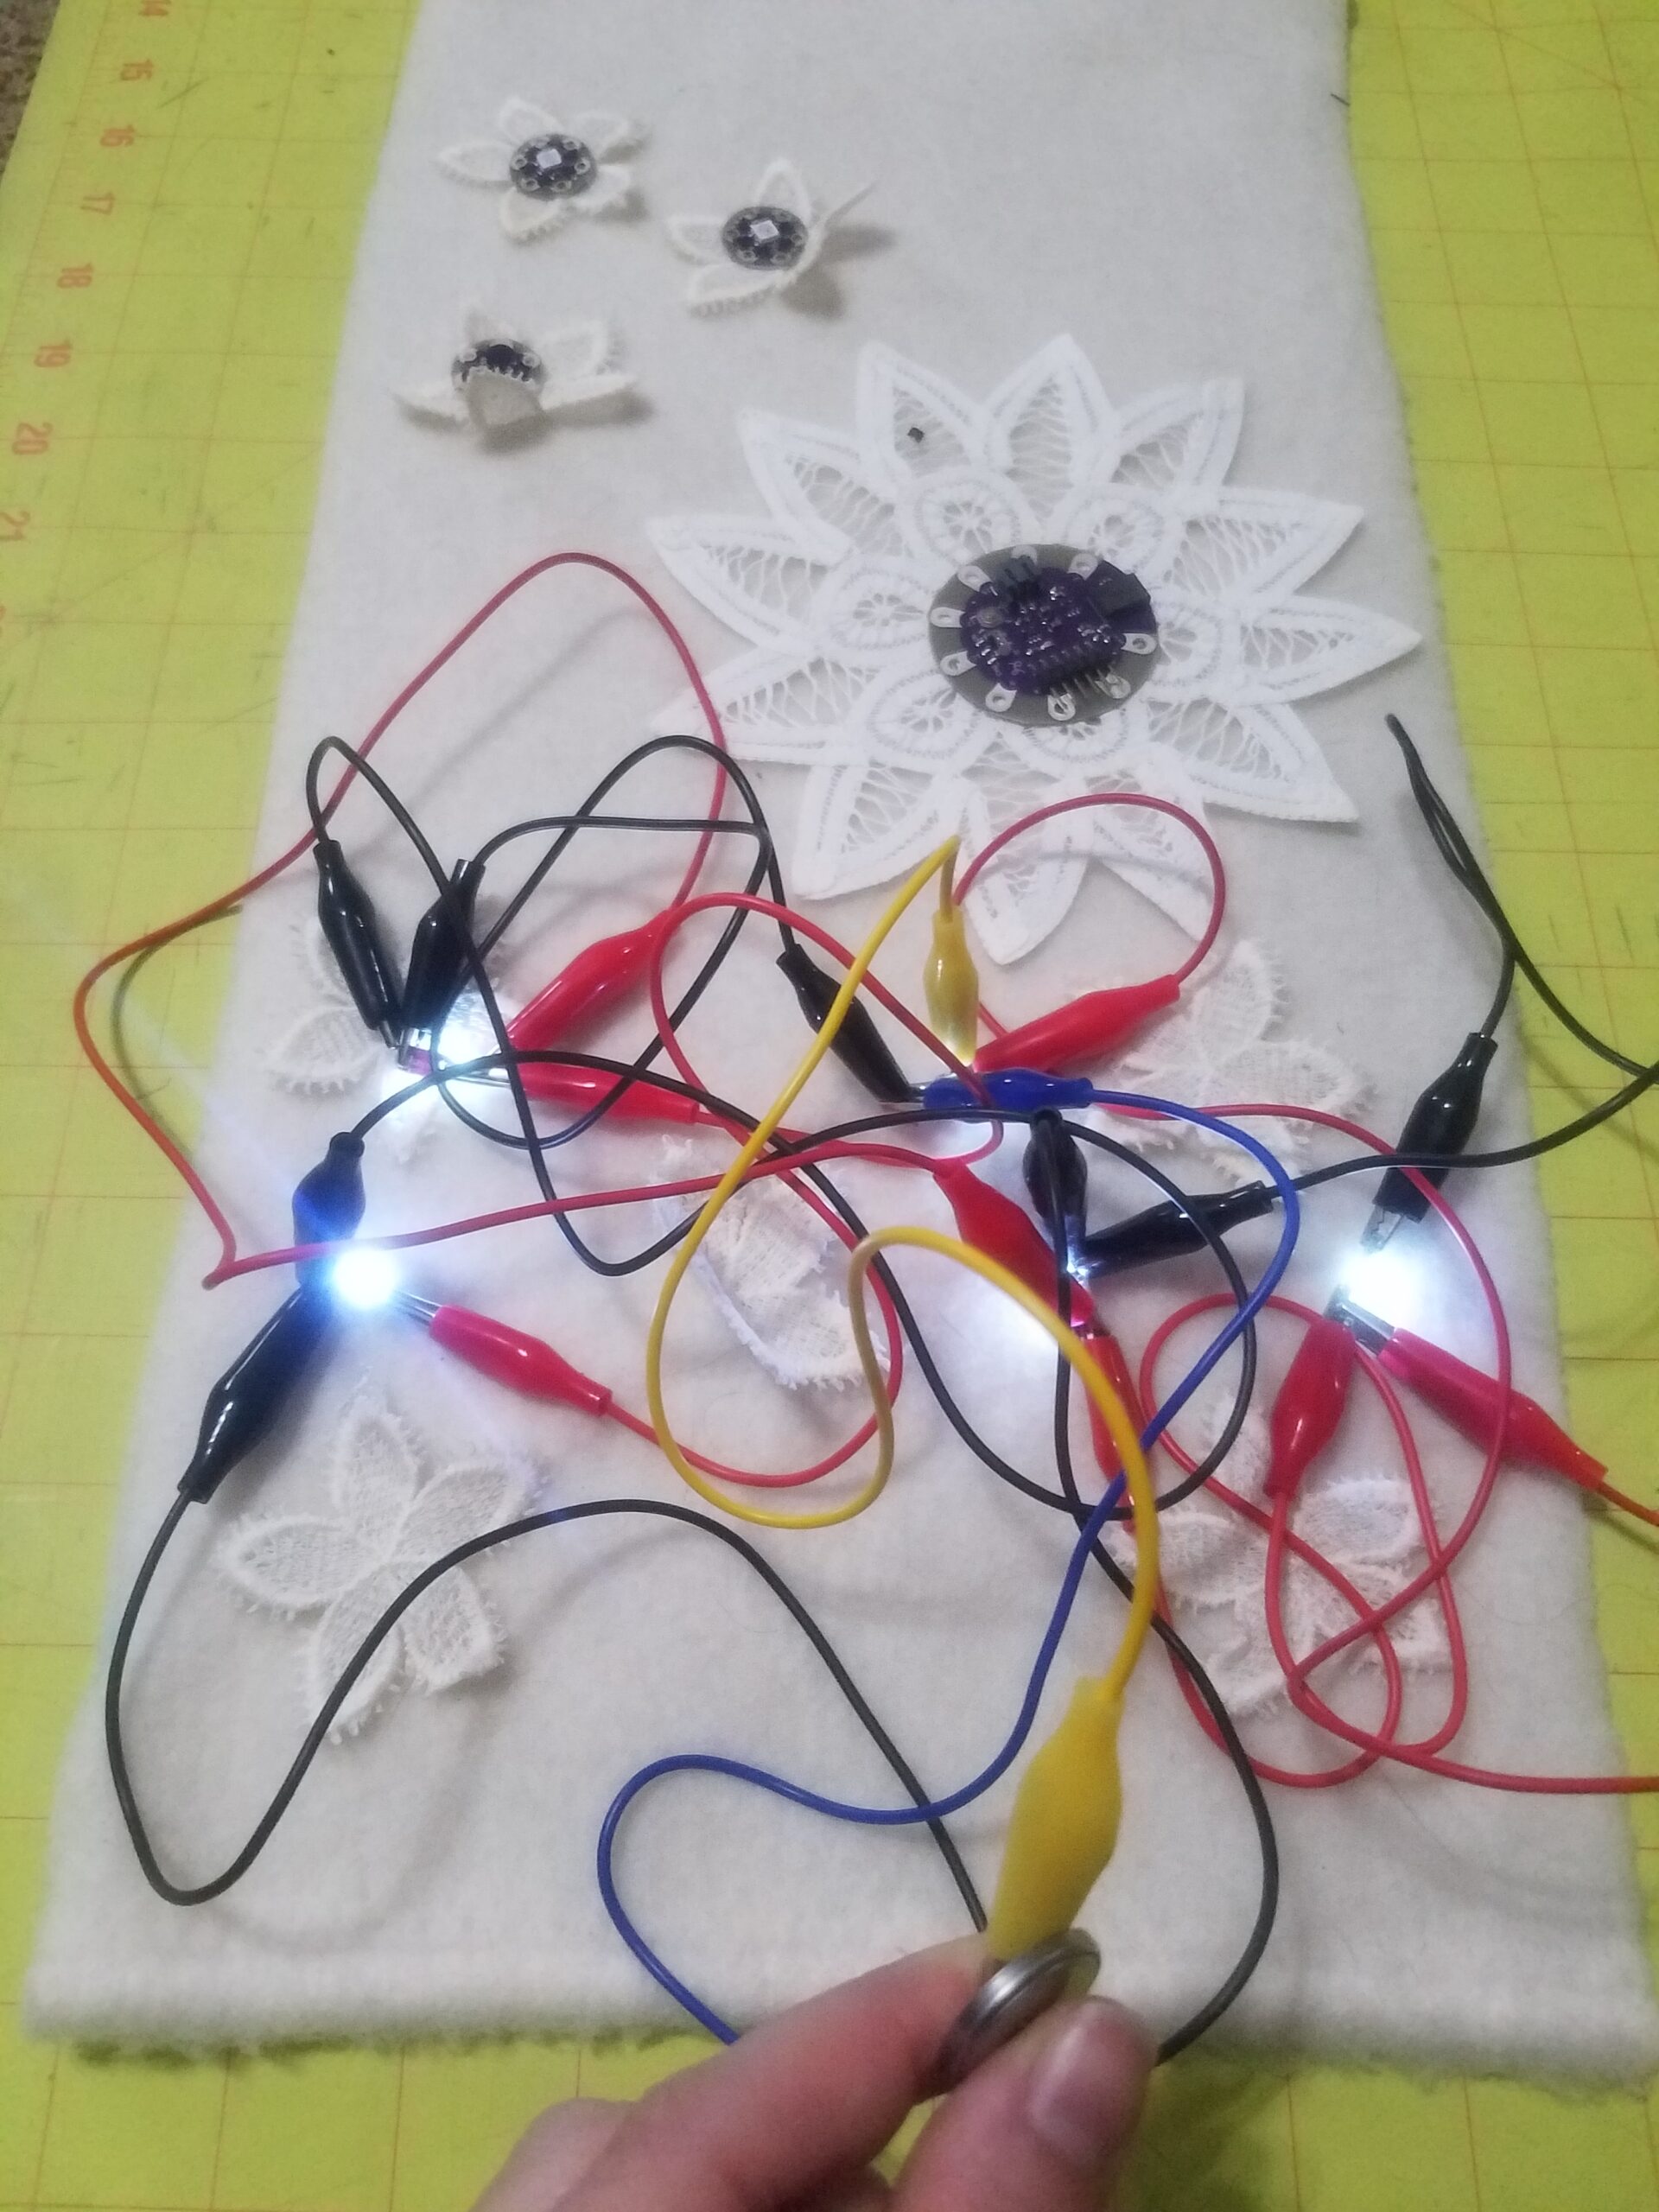
Now it is time to test out some base code and make sure that everything will light up in the design you have chosen. I started by attaching all of the individual LED’s to their own pin so I could eventually have them each have their induvial rate of twinkle. Next I added the temperature sensor with the alligator clips. I worked up a code that made an LED light up if the temperature read over 70 degrees. Finally I added the two NeoPixel’s to the pin they would be attached to and had the board turn them on and change color.
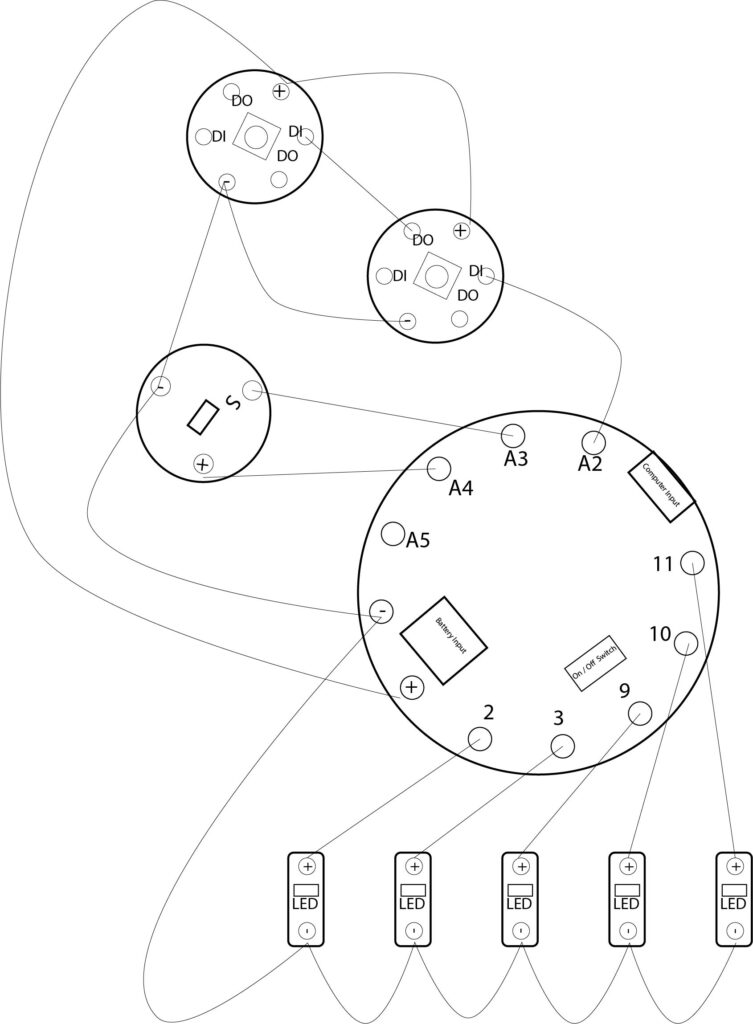
Here is the final layout for my Circuit. This will be important for when I write the code.
Sewing the Circuit onto the Temperature Sensing Light Up Scarf

Time to sew everything down. I began with the temperature sensor and NeoPixels. Following my layout diagram I double checked I was sewing the correct pin to the correct pin. Using a simple backstitch to achieve more of a solid line look, I made my lines curvy to simulate artistic stems. In each pin I made sure to whip stitch around at least 5 times to create a solid connection between the thread and pin.
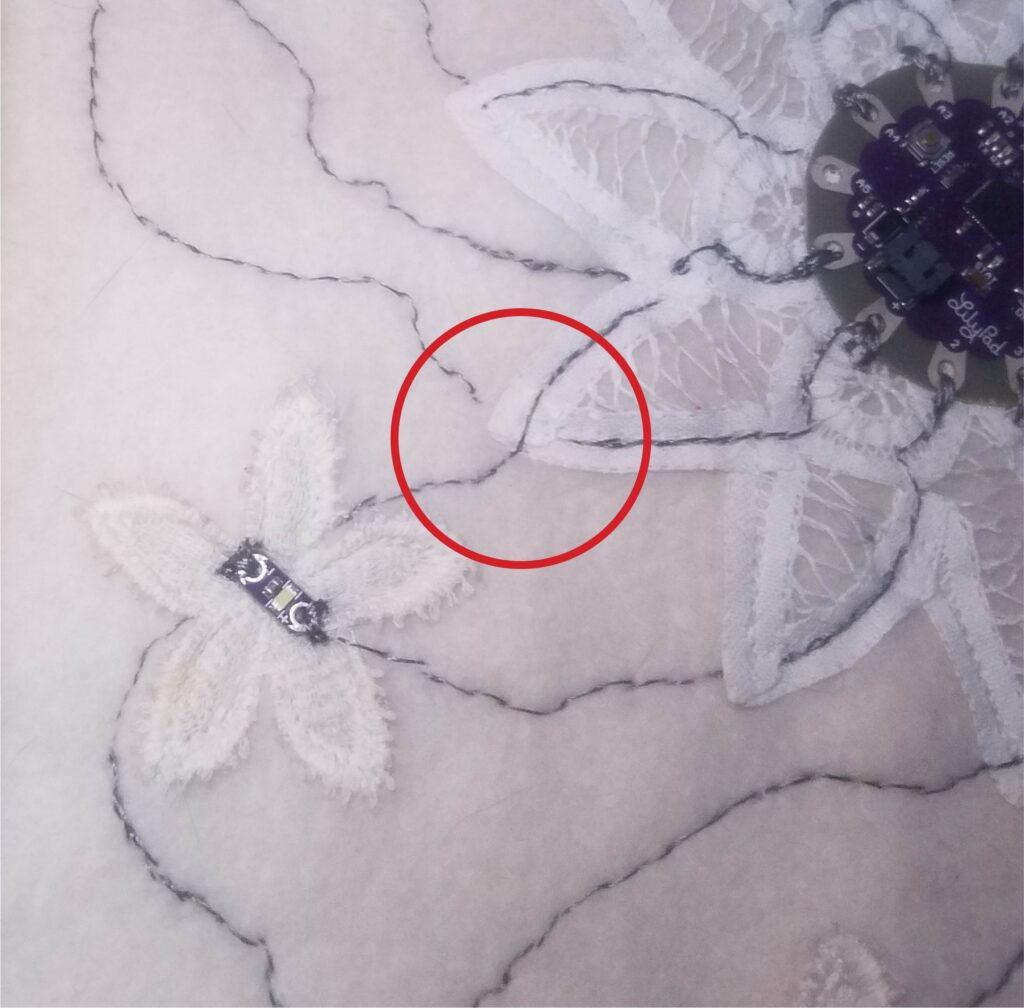
There is one place in particular that you will have to pay close attention to. It is the point where the positive and negative threads will intersect. I designed this intersection to happen over the point of my flower so that the negative thread could float on top of the applique and the positive could sink beneath applique and fleece. This provides a barrier between the conductive threads so that they will not short circuit.
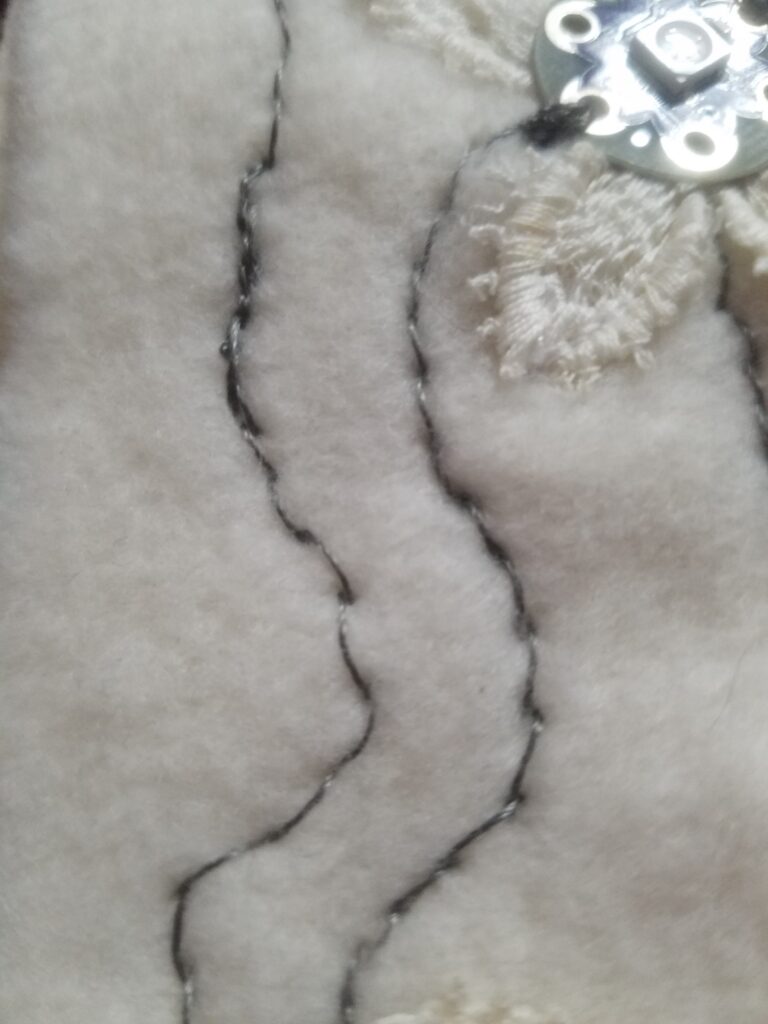
This thread dose knot and break very easily. I had a few times when the thread broke half way through my line. When this happened I would start my thread up at least 5 stitches before the break to make sure there would be a solid connection for the current to run through.
The Code
I knew that I wanted the five white LED’s to continually twinkle in a random array. Since that was the easiest part of the code I started there.
Next I moved onto figuring out the different colors I desired the NeoPixels to turn for each range of temperatures. Finally I added all the if / else if statements so that the Neopixels would change when to change.
//Temp Sensor Set up
 int sensorPin = A3;

// Set temperature thresholds for the variable to check against. If the temperature reading is above

 int threshold1 =  32; // WHITE
 int threshold2 =  40; //PURPLE
 int threshold3 =  50; //BLUE
 int threshold4 =  60; //TEAL
 int threshold5 =  70; //GREEN
 int threshold6 =  80; //YELLOW
 int threshold7 =  90; //ORANGE
               //  >90   RED

//NeoPixel Set up
#include <Adafruit_NeoPixel.h>

int alertLED = A2; // Pin the NeoPixels are out of

#define NUMPIXELS 3 // How many NeoPixels You have in the sequence

// Declare the NeoPixel pixels object:
Adafruit_NeoPixel pixels(NUMPIXELS, alertLED, NEO_GRB + NEO_KHZ800);

//Depending on what board you use as well as what NeoPixels you use will change the third and fouth objects
//   NEO_KHZ800  800 KHz bitstream (most NeoPixel products w/WS2812 LEDs)
//   NEO_KHZ400  400 KHz (classic 'v1' (not v2) FLORA pixels, WS2811 drivers)
//   NEO_GRB     Pixels are wired for GRB bitstream (most NeoPixel products)
//   NEO_RGB     Pixels are wired for RGB bitstream (v1 FLORA pixels, not v2)
//   NEO_RGBW    Pixels are wired for RGBW bitstream (NeoPixel RGBW products)

//Twlinking LED's Pins
int ledA = 2;
int ledB = 3;
int ledC = 9;
int ledD = 10;
int ledE = 11;

void setup() {
// Set the temperature sensor pin as an INPUT:
  pinMode(sensorPin, INPUT);

// Set pin A4 to use as a power pin for the light sensor
  pinMode(A4, OUTPUT);
  digitalWrite(A4, HIGH);

// Make A2 an output for the NeoPixels
  pinMode(alertLED, OUTPUT);

// Initialize Serial, set the baud rate to 9600 bps.
  Serial.begin(9600);

  pixels.begin(); // INITIALIZE NeoPixel strip object (REQUIRED)

//Turin on all the LED pins
  pinMode(ledA, OUTPUT);
  pinMode(ledB, OUTPUT);
  pinMode(ledC, OUTPUT);
  pinMode(ledD, OUTPUT);
  pinMode(ledE, OUTPUT);
}

void loop() {

   // Variable to store raw temperature
  long rawTemp;

  // Variable to store voltage calculation
  float voltage;

  // Variable to store Fahrenheit value
  float fahrenheit;

  // Variable to store Celsius value
  float celsius;

  // Read the raw 0-1023 value of temperature into a variable.
  rawTemp = analogRead(sensorPin);

  // Calculate the voltage, based on that value.
  // Multiply by maximum voltage (3.3V) and divide by maximum ADC value (1023).
  // If you plan on using this with a LilyPad Simple Arduino on USB power, change to 4.2
  voltage = rawTemp * (3.3 / 1023.0);
  Serial.print("Voltage: "); // Print voltage reading to serial monitor
  Serial.println(voltage);

  // Calculate the celsius temperature, based on that voltage..
  celsius = (voltage - 0.5) * 100;
  Serial.print("Celsius: "); // Print celcius temp to serial monitor
  Serial.println(celsius);

  // Use a common equation to convert celsius to Fahrenheit. F = C*9/5 + 32.
  fahrenheit = (celsius * 9.0 / 5.0);
  Serial.print("Fahrenheit: "); // Print Fahrenheit temp to serial monitor
  Serial.println(fahrenheit);
  // Print a blank line
  Serial.println();

  // Check the temperature, and turn on the LEDs associated with the hot or cold thresholds
  if (fahrenheit <= threshold1) // If the temperature rises above the threshold:
  {
   pixels.show();     //WHITE
   pixels.setPixelColor(0, pixels.Color(63, 63, 63));
   pixels.setPixelColor(1, pixels.Color(63, 63, 63));
    //digitalWrite(alertLED, HIGH); // Turn the LED on
   // Serial.println("Thermal alert!");
  }
  else if (fahrenheit <= threshold2)
  {
   pixels.show();    // PURPLE
   pixels.setPixelColor(0, pixels.Color(102, 0, 202));
   pixels.setPixelColor(1, pixels.Color(102, 0, 202));
    //digitalWrite(alertLED, HIGH); // Turn the LED on
    //Serial.println("Thermal alert!");
  }
  else if (fahrenheit <= threshold3)
  {
   pixels.show();   //BLUE
   pixels.setPixelColor(0, pixels.Color(0, 0, 255));
   pixels.setPixelColor(1, pixels.Color(0, 0, 255));
    //digitalWrite(alertLED, HIGH); // Turn the LED on
    //Serial.println("Thermal alert!");
  }
   else if (fahrenheit <= threshold4)
  {
   pixels.show();     //TEAL
   pixels.setPixelColor(0, pixels.Color(0, 255, 255));
   pixels.setPixelColor(1, pixels.Color(0, 255, 255));
    //digitalWrite(alertLED, HIGH); // Turn the LED on
   // Serial.println("Thermal alert!");
  }
     else if (fahrenheit <= threshold5)
  {
   pixels.show();     //GREEN
   pixels.setPixelColor(0, pixels.Color(0, 102, 0));
   pixels.setPixelColor(1, pixels.Color(0, 102, 0));
    //digitalWrite(alertLED, HIGH); // Turn the LED on
   // Serial.println("Thermal alert!");
  }
     else if (fahrenheit <= threshold6)
  {
   pixels.show();     //YELLOW
   pixels.setPixelColor(0, pixels.Color(255, 255, 0));
   pixels.setPixelColor(1, pixels.Color(255, 255, 0));
    //digitalWrite(alertLED, HIGH); // Turn the LED on
   // Serial.println("Thermal alert!");
  }
     else if (fahrenheit <= threshold7)
  {
   pixels.show();     //ORANGE
   pixels.setPixelColor(0, pixels.Color(255, 102, 0));
   pixels.setPixelColor(1, pixels.Color(255, 102, 0));
    //digitalWrite(alertLED, HIGH); // Turn the LED on
   // Serial.println("Thermal alert!");
  }
   else if (fahrenheit >= threshold7)
  {
   pixels.show();     //RED
   pixels.setPixelColor(0, pixels.Color(255, 0, 0));
   pixels.setPixelColor(1, pixels.Color(255, 0, 0));
    //digitalWrite(alertLED, HIGH); // Turn the LED on
   // Serial.println("Thermal alert!");
  }

//Make the Led's reandomly trun on and off to simulate twinkiling
  // Round 1
   digitalWrite(ledA, HIGH);
   delay(300);
   digitalWrite(ledB, HIGH);
   delay(100);
   digitalWrite(ledE, HIGH);
   delay(30);
   digitalWrite(ledC, LOW);
   delay(250);
   digitalWrite(ledD, LOW);
   delay(75);


   digitalWrite(ledA, LOW);
   delay(160);
   digitalWrite(ledB, LOW);
   delay(30);
   digitalWrite(ledC, HIGH);
   delay(250);
   digitalWrite(ledD, HIGH);
   delay(500);
   digitalWrite(ledE, LOW);
   delay(100);

  // Round 2

   digitalWrite(ledA, HIGH);
   delay(100);
   digitalWrite(ledB, HIGH);
   delay(30);
   digitalWrite(ledE, HIGH);
   delay(150);
   digitalWrite(ledC, LOW);
   delay(100);
   digitalWrite(ledD, LOW);
   delay(200);


   digitalWrite(ledA, LOW);
   delay(60);
   digitalWrite(ledB, LOW);
   delay(300);
   digitalWrite(ledC, HIGH);
   delay(50);
   digitalWrite(ledD, HIGH);
   delay(500);
   digitalWrite(ledE, LOW);
   delay(50);

  // Round 3

   digitalWrite(ledA, HIGH);
   delay(30);
   digitalWrite(ledB, HIGH);
   delay(90);
   digitalWrite(ledE, HIGH);
   delay(500);
   digitalWrite(ledC, LOW);
   delay(50);
   digitalWrite(ledD, LOW);
   delay(375);


   digitalWrite(ledA, LOW);
   delay(160);
   digitalWrite(ledB, LOW);
   delay(630);
   digitalWrite(ledC, HIGH);
   delay(750);
   digitalWrite(ledD, HIGH);
   delay(550);
   digitalWrite(ledE, LOW);
   delay(100);

}
Finishing Touches
To help coat the conductive thread you can add a layer of puff paint. This would prevent any of the threads connecting and shorting the circuit out. However it will provide a different look for your Temperature Sensing Light Up Scarf. I chose to not use any puff paint because I did not like the final look. I know that I have to be a little more aware while wearing my scarf and check for the short circuits.
Final Shots of the Temperature Sensing Light Up Scarf

Temperature Sensing Light Up Scarf 
Final Temperature Sensing Light Up Scarf
Make sure to come back tomorrow for Day 3 of 25 Days of Christmas. Did you miss yesterdays fun project? See Day 1 creative holiday project.
Want a checklist of commonly used tools and components?
