The Sewable light-up Pumpkin Pin is a quick and easy project that you can make in just about an hour! This pumpkin pin has lights inside of it so when the wearer presses on it, they will see their hand pressed against the pumpkin’s face. The best part? It’s not complicated to create this accessory – all you need is felt, thread both regular and conductive, some LilyPad sewable electronics components and a LilyPad button board. With these materials ready, let’s start sewing!
Gather you Materials
- LilyPad Button Battry Board
- Battery
- Sewable LED
- Conductive thread
- Regular Thread
- Felt (Orange, Yellow Brown)
- Pattern
- Pin
- Scissors
- Hand Sewing Needle
- Stuffing
Creating the light-up Pumpkin Pin
First we are going to print out and cut out the patter of the pumpkin. We will be using the pattern below. Once you have cut out your felt pieces, we can begin to sew them together.
We are going to start by sewing the front and back of the pumpkin together with regular thread and a blanket stitch. Sew Begin on one side of the pumpkin and sew around the top half of the pumpkin. Make sure to stop sewing the pumpkin together on the other side. We will need to add the sew able components before fully closing the pumpkin.
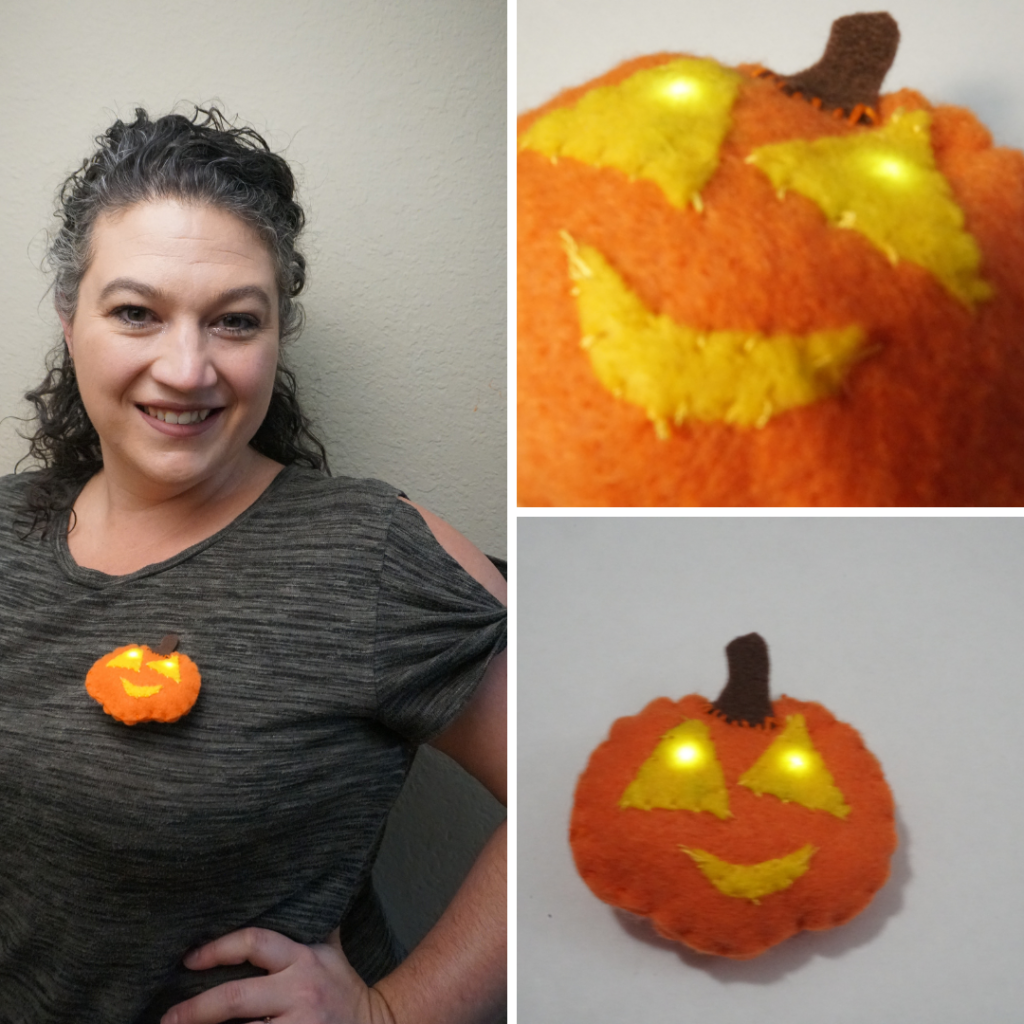
Figure out the placement of the eyes and mouth of your pumpkin and make where all your LEDs will be placed. I chose to have my LED only under the eyes.
You can place your LEDs anywhere you would like under the pumpkin. Make sure the LED are facing outwards and sew them in with conductive thread. Sew from positive port to positive pot and negative port to negative port. Be careful not to sew over the opposite conductive thread or the circuit will not work.
I chose to use two LilyPad Sewable LEDs and one LilyPad Button Battery Board with a switch. This will ensure that my circuit is small and contained plus having the built in switch is extra convenient.
Tips for when you are sewing with conductive thread.
Tip 1 – Do not use long strands of conductive thread. The thread like to tangle and break so ensure that you are using shorter lengths that will still get you from port to port.
Tip 2 – Sew at least three times around each port to have a strong connection
Tip 3 – When sewing on felt it is possible to not see your traveling stitches on the outside of the project by sewing on the inside and part way through the felt. This will keep the outside of your project clean and no random stitches.
Finishing the Light-Up Pumpkin Pin
Once the circuit is complete it is time to test the ensure the connections are good. Do this by inserting a battery and turning the switch ot on. Once you know the LED will light it is time to stuff and finish sewing up the pumpkin pin. Pick up the needle with the regular thread on it and finish the blanket stich around. Before you fully enclose the pumpkin make sure it has your ideal amount of stuffing!!!
Now that everything is enclosed it is time to add on the details of the eyes mouth and pin on the back. Sew the triangles over the eyes ensuring that the felt is covering up the LED. Since it is a pumpkin I let my stitches look a little patchwork like however the design is totally up to you!!! Dont forget the stem at the top!!!
Now you have a fun new pin to light up any meeting you attend before Halloween or for fun any other time of the year!!!
Want to begin your own adventure into Wearable electronics? Grab my free mini-course to start learning the basics!!!
Love this pin check out some of the other light up projects I have. Such as the felt flower light-up earrings. Get some inspiration and create some for yourself. Then post a picture below!!! I would love to see what you create!!!
2 Replies to “How to make Sewable light-up Pumpkin Pin”
Comments are closed.