This year for independence day, I decided to make a LED Fireworks 4th of July Hat. I love to see fireworks explode into the sky and incorporate that into this fun, unique project!!! So I bought an 8×8 matrix and a board and began working with the programming to see how to create some fireworks.
Gather your materials
- 8×8 RGB Matrix
- Seeeduino XIAO
- Fedora hat
- Wires
- JST connectors
- Transfer cord
- bread board & Uno board
- Jumpers
- Soldering kit
- Battery
Desing the LED Fireworks 4th of July Hat
The design of the Hat was straightforward. I plan to add the matrix onto the right side of the Hat and program it. The programming will be the significant feature of the LED Firework 4th of July Hat.
Building the LED Fireworks 4th of July Hat
The building process is also straightforward. Start by seam ripping the top of the hatband so that the wires can be fed through and hidden on the inside of the Hat. Next, seam-rip the seam between the brim and the rest of the Hat. This will finish opening up the hole to feed the wires through.
Before we apply the matrix to the Hat, we will want to complete all the soldering. Then, we will create the connections that will connect the board to the matrix using JST connectors, some wire, and solder.
Start by tinning the end of the wire and lining up the placement with either the male or female JST connecter. The two prongs at the end I like to use to clamp down the wire. I find this helps with stability when inserting the prong into the plastic housing. Next, solder the wire to the male or female connector. Finally, bend the metals around to help with security. It is not necessary to solder the wire to the connector. Still, I prefer to because I find the connections are better. Once the wire and connecter are one, it can be inserted into the plastic housing. Double-check the placement of each wire before you entirely set the prongs in the plastic housing. I do this by lining up the male and female housing and color coordinating the wires. Red is power, black is ground, and green is the data.
Time to solder the wires to the board. Take the two power cords, twist them together and feed them through the power port on the board. Flip the board over and solder them. Repeat with the two black wires. Only one green wire is required and will be added to the one three-pronged JST connector.
Programming the Matrix
Time to breadboard and figure out the sequence of the LED. This is important for how I will be writing the code. I use the jumpers connected into the JST connector and then attached to the breadboard to connect the matrix to the Uno for basic testing and creating my wiring diagram.
I wrote a simple code that would walk the matrix through the first 18 LEDs by turning the first LED on the off and turning the next one on and off.
Once I know the layout, I set up a grid with the number labeled to reference while I was coding easily.
Now that I have my layout known, I am going to write a single firework explosion. The code looks a little like this.
The single firework looks like this,
Now that I am happy with the basic firework, I can easily create some more fireworks using the code. I upload them to the board each time to double-check the color and sequence.
Once I am happy with the final code, I will upload it to the Seediuno board, plug in the matrix, and enjoy the code I wrote.
Finishing Touches LED Fireworks 4th of July Hat
Place the matrix on the Hat and feed the wires to the inside.
Time to hand sew on the matrix. I started on the inside with a single thread, poked to the outside traveled in between the top row of LEDs and the second row of LEDs the poked back to the interior. I continued to do this for every row, moving down the matrix and back up to the top.
Now we will need to add a pocket to hold the battery and board. With a small amount of fabric, create a pocket, and with a prick stitch through the top of the Hat, sew the piece of fabric onto the top of the inside of the Hat. I also added a small pocket for the board to rest in on the pocket.
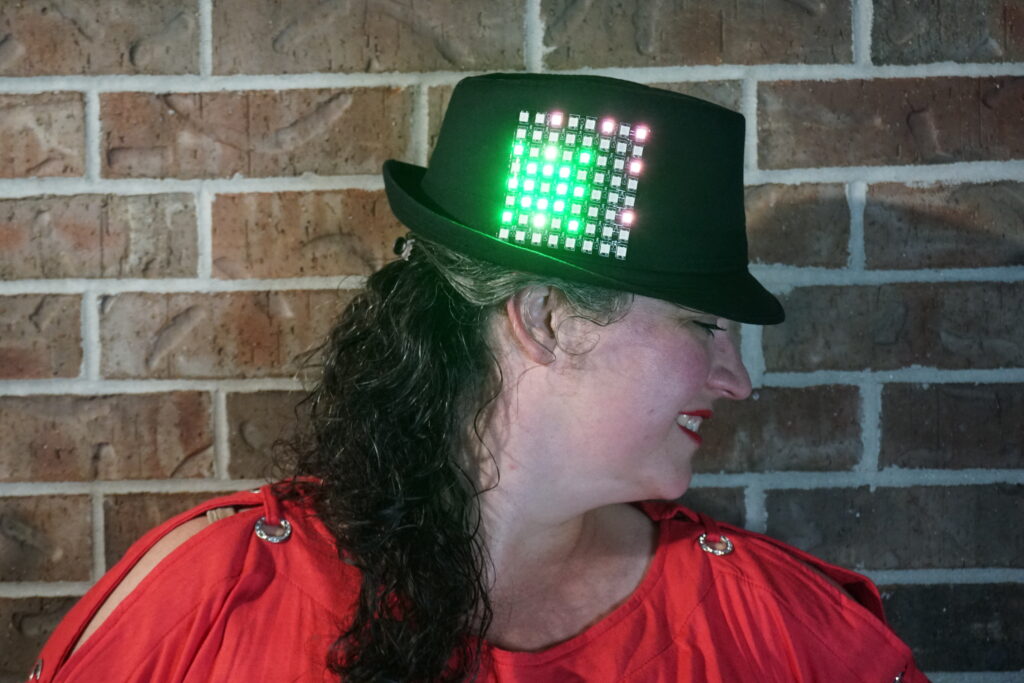
Time to plug in the LED Fireworks 4th of July Hate together and turn it on!!!
Final look of the LED Firework 4th of July Hat
Want to begin your own adventure into Wearable Technology?!?!? Grab my Checklist to help you get started!!!

Check out some of my other wearable projects like these fun Light-up earrings or this temapture sensing scarf!!! Make sure to check back later to see how else this hat can be programed.